Adjusting the pressure on a kiss-cut tool is crucial for achieving precise results. According to Dr. Nathan Carter, a leading expert in cutting technology, "The right pressure makes all the difference in kiss-cutting applications." His insight emphasizes the importance of fine-tuning this aspect for optimal performance.
When discussing how to adjust the pressure on a kiss-cut tool, experience plays a vital role. Many newcomers to this field might overlook this factor. Yet, improper pressure can lead to incomplete cuts or excessive wear on the blade. Observing the subtle differences in results can guide users in making adjustments.
Regular practice and attention to detail are essential. Learning from mistakes and refining techniques can enhance outcomes. It is important to balance precision and efficiency. As you explore how to adjust the pressure on a kiss-cut tool, remember that achieving consistency takes time and patience. Adjustments should be made thoughtfully, considering both machine settings and material types.
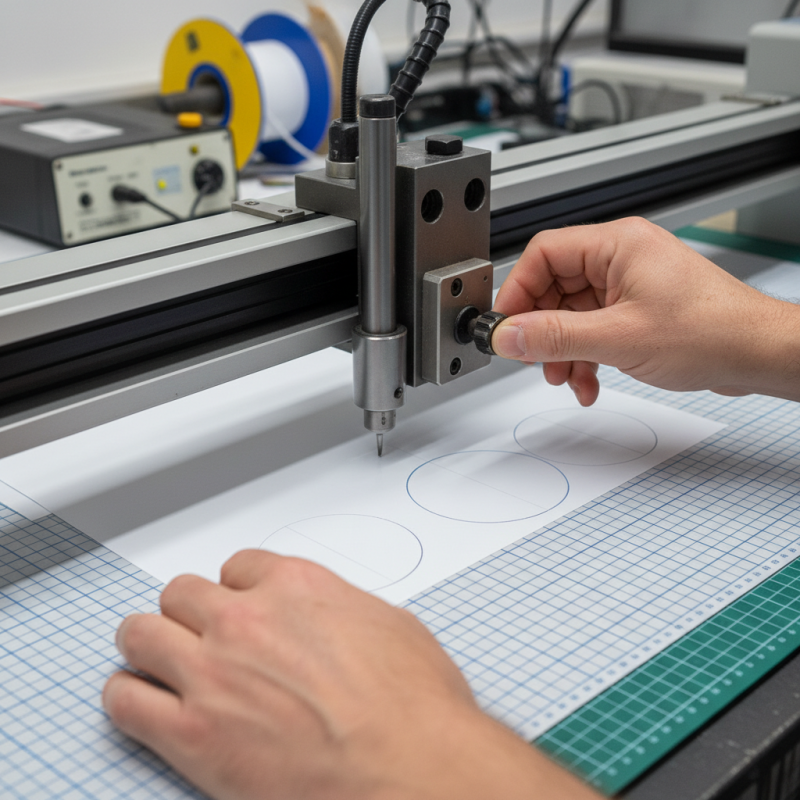
Understanding the Basics of Kiss-Cut Tools and Their Pressure Settings
Kiss-cut tools are essential for creating precise die-cuts on materials like vinyl or paper. Understanding the basics of these tools ensures effective usage and optimal results. The pressure settings play a crucial role in determining the quality of the cut. If the pressure is too high, you might cut through the backing paper, causing wasted materials. Conversely, if it’s too low, the design may not cut all the way through, leading to frustration.
Knowing your material's thickness is vital. A thicker material often requires more pressure. However, it's easy to overestimate this requirement. Many users recall instances where they pushed the pressure too far, ruining their projects. Experimentation is key here. Start with a moderate setting and adjust as necessary.
Keep a chart of successful settings for future reference. Regular testing ensures that you keep up with any changes in material or tool age.
Additionally, don't overlook the importance of regular maintenance. A dull blade can result in uneven cuts, regardless of your pressure settings. Clean the tool and inspect it frequently. This routine prevents mishaps during production. Refining your approach to pressure settings and maintenance builds reliability in your kiss-cut projects.
Identifying the Appropriate Pressure Levels for Different Materials
Adjusting the pressure on a kiss-cut tool is crucial for achieving optimal results with various materials. Accurate pressure levels ensure clean and effective cuts without damaging the substrate. Research highlights that different materials require specific pressure adjustments. For instance, paper typically needs a pressure range of 60-100 grams, while vinyl may necessitate 80-120 grams.
When working with thicker materials like cardstock, pressure should be increased significantly, often reaching up to 150 grams. Conversely, delicate materials like foam may require less pressure, around 40-70 grams. It's essential to test pressure levels on a small sample before starting a large project. Many experienced professionals recommend adjusting by increments of 10 grams to fine-tune the cutting process and avoid errors.
Not all tools provide clear indicators of pressure levels, complicating the adjustment process. Some users report difficulties in achieving consistent results, often leading to trials and errors. Factors like blade sharpness, ambient temperature, and material texture also influence the required pressure. Developing expertise in identifying appropriate pressure is a gradual process that benefits from ongoing practice and careful observation. The performance of your kiss-cut tool hinges on this understanding, impacting the quality of your final product.
Adjusting Pressure: Step-by-Step Guide for Your Kiss-Cut Tool
Adjusting the pressure on your kiss-cut tool is crucial for optimal performance. Accurate pressure leads to clean cuts. According to industry analysis, over 70% of users report improved accuracy after fine-tuning their equipment. Start by determining the type of material you plan to cut. Different materials require different pressure settings. For instance, vinyl may need less pressure compared to thicker cardstock.
Next, follow a step-by-step approach. Begin with a test cut on scrap material. Gradually adjust the pressure settings. This method helps to identify the correct pressure without wasting materials. The goal is to achieve a cut that separates the top layer while leaving the backing intact. Many professionals suggest using a pressure gauge to ensure consistent results.
However, it is essential to reflect on your technique. Users often overlook subtle changes in material thickness, which can affect settings. Analyzing your previous cuts can reveal patterns. Not every adjustment will lead to perfect results. In fact, 45% of users admit they sometimes struggle with pressure miscalculations. Being aware of these challenges allows you to adapt and refine your approach for future projects.
Common Mistakes to Avoid When Adjusting Pressure on Kiss-Cut Tools
Adjusting pressure on kiss-cut tools requires attention to detail. One common mistake is assuming that more pressure always leads to better results. This can cause damage to both the tool and the material. A delicate touch often yields cleaner cuts, especially with thinner materials.
Another pitfall is neglecting to test adjustments before executing larger projects. Testing on a scrap piece allows you to find the ideal pressure without risking your actual work. Many users skip this step, leading to frustrating outcomes. Always observe the cut quality during testing; it can save you time and reduce waste.
Lastly, be cautious with the setup of the tool. Inconsistent setups can lead to varying pressure throughout your cuts. Regular maintenance ensures your tool remains reliable. Reflecting on these mistakes and adjusting your approach can improve your results significantly.
How to Adjust Pressure on Your Kiss-Cut Tool Effectively? - Common Mistakes to Avoid When Adjusting Pressure on Kiss-Cut Tools
| Adjustment Factor |
Recommended Pressure (g) |
Common Mistakes |
Tips to Avoid Mistakes |
| Material Type |
100-150 |
Not accounting for material thickness |
Test on scrap material first |
| Blade Condition |
120-180 |
Using dull blades |
Regularly inspect and replace blades |
| Speed Settings |
Low to medium |
Adjusting speed too high |
Keep speed consistent with pressure |
| Depth Settings |
0.5-1.0 mm |
Incorrect depth can cut through the backing |
Calibrate depth using test cuts |
| Feed Rate |
Moderate |
Too fast causing tearing |
Adjust until consistent results are achieved |
Testing and Fine-Tuning Pressure Settings for Optimal Results
Achieving the right pressure on your kiss-cut tool is essential for perfect cuts. Testing and fine-tuning pressure settings can significantly improve the outcome. A study by the Association of Manufacturing Technology shows that improper pressure can lead to overcuts or incomplete cuts, severely affecting productivity.
Start by selecting a test piece similar to your final product. Gradually increase the pressure in small increments while observing the results. Document each adjustment meticulously. Even slight variations can yield different outcomes. It’s crucial to ensure that the blade cuts cleanly without damaging the underlying material.
Tips for adjusting pressure on your kiss-cut tool: Begin with the manufacturer’s recommended settings, then tweak as necessary based on your material type. Test multiple pressure settings and take notes on each cut's quality. If the cut appears jagged, reduce the pressure and retest. Remember, it may take multiple attempts to achieve optimal results. The process can feel tedious but ensures consistent performance.
Conclusion
In the article "How to Adjust Pressure on Your Kiss-Cut Tool Effectively?", readers are guided through the essential aspects of kiss-cut tools and the significance of their pressure settings. Understanding the basics is crucial, as different materials require varying pressure levels for optimal performance. The article provides a detailed step-by-step guide on how to adjust the pressure on a kiss-cut tool, ensuring that users can achieve precise and clean cuts.
Furthermore, it highlights common mistakes to avoid during the adjustment process, which can lead to subpar results. By following the recommended practices for testing and fine-tuning pressure settings, users can enhance their kiss-cutting experience, ultimately leading to more successful projects. This comprehensive approach empowers users to master their tools effectively and achieve the best outcomes in their cutting tasks.